Connect Avoma with Salesforce to keep your CRM up to date automatically. Sync meeting notes and AI-generated insights with your Salesforce leads, accounts, and opportunities. You do not have to copy and paste updates manually.
This integration helps your team capture important customer details and keep Salesforce accurate and complete.
By integrating Avoma with Salesforce:
- Notes and captured insights from recorded meetings sync automatically to related Salesforce records.
- Admins can manage this connection centrally — users don’t need to manually copy notes into Salesforce.
- The integration streamlines CRM updates and improves visibility into customer interactions.
Prerequisites
Before you connect Salesforce to Avoma, make sure:
- You must have Salesforce admin rights (or permission to authorize external app connections).
- Your Avoma account must include Recorder licenses, as CRM sync requires a paid subscription.
- Enhanced Notes must be enabled in Salesforce for synced notes to display properly. Enable Enhanced Notes in Salesforce
Steps to connect
- Log into your Avoma account and navigate to Settings page.
- Under Settings, go to CRM section and look for Salesforce integration.
-png.png?width=670&height=458&name=image%20478%20(2)-png.png)
- Click on the “Connect ” button. You will now see a permission screen like below.
- Click "Allow" to grant the necessary permissions.
.png?width=250&height=251&name=image%20479%20(4).png)
- After successful authentication and authorization, Salesforce will show as connected within Avoma.
-png.png?width=670&height=468&name=image%20480%20(3)-png.png)
- Once connected, click on Configure to review the settings
Configure your sync settings
In the notes > you section, choose which Salesforce objects your notes should sync with.
In notes > organization, manage sync preferences for your entire team.
In notes > members, check sync settings for all members.
Note: Only notes for non-private meetings sync automatically. To sync private meeting notes, trigger it manually in Avoma.
-png.png?width=670&height=363&name=image%20481%20(2)-png.png)
In the Objects section , you can map Avoma properties and smart categories to your Salesforce objects. Know more about CRM mapping here
Everyday Usage
Automatic syncing
Avoma matches meeting participants to leads, accounts, or opportunities in Salesforce.
Once synced:
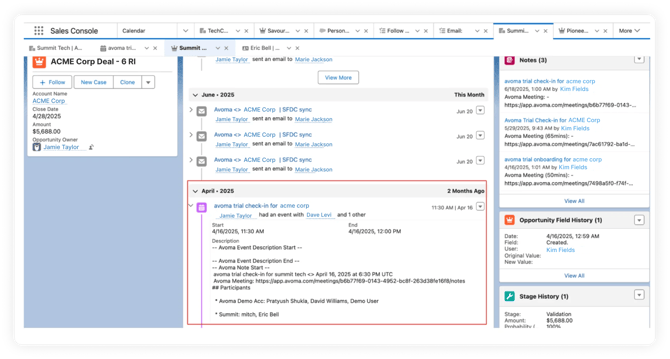
- Notes, transcripts, and insights appear in the notes and activity feed sections of the related Salesforce records.
- Your team gets clear visibility into meeting outcomes without extra manual steps.
.png?width=670&height=429&name=Meeting%20notes%2c%20insight%20and%20ask%20avoma%20base%20frame%20%E2%9C%85%20(5).png)
Manual linking and syncing
If Avoma can’t auto-associate a meeting:
- Use the No Associations icon to manually link the meeting to the correct Salesforce record.
- Click Sync in the Notes section to push updates at any time.
- Open related Salesforce records directly from Avoma using the Salesforce icon next to the meeting.
.png?width=670&height=429&name=Meeting%20notes%2c%20insight%20and%20ask%20avoma%20base%20frame%20%E2%9C%85%20(6).png)
Editing synced notes
- Edits made in Avoma will automatically sync to Salesforce objects, keeping your CRM records updated.
- Edits made directly in Salesforce will not sync back to Avoma. To maintain consistency, we recommend making updates in Avoma first.
Enhanced Notes
To ensure synced notes display correctly :
- Enable Enhanced Notes in your Salesforce org.
- Make Enhanced Notes available for Leads, Accounts, and Opportunities. Please check this article to learn how to enable Enhanced Notes
How to disconnect the integration
In order to disconnect the Salesforce integration, please reach out to Avoma support. After disconnecting, meeting notes will no longer sync to Salesforce. Members would need to enter notes manually if needed.
Need Help?
For assistance, contact us at help@avoma.com — we’re happy to help!