Avoma MCP lets your team access meeting data and insights directly from Claude. You configure and publish the connector once as an admin. After that, team members connect their own Avoma accounts and start using it. No further admin action required.
This guide applies to all Claude surfaces: web, mobile, and desktop.
This guide is for Claude org owners (admins) only. If you're a team member, see how members can connect & use the Avoma MCP Connector in Claude instead.
|
Before you begin
|
Note: To use Avoma MCP with ChatGPT, connect via OAuth in ChatGPT. See How admins can add the Avoma MCP Connector in ChatGPT.
Step 1: Configure Avoma MCP connector as an admin
- Click your name in the Claude interface.
- Select Organization Settings (this option appears only for org admins).
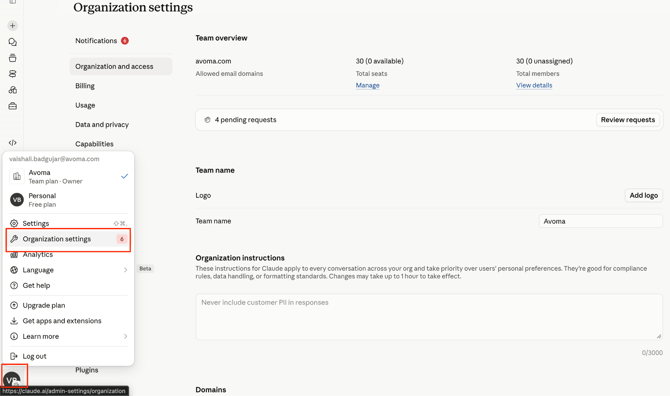
Claude → Organization Settings menu item visible in the user dropdown - Scroll down to the Connector section.
- Click the Add button in the top right.
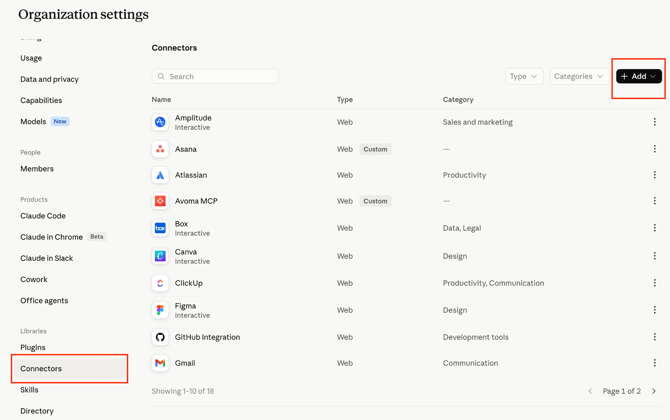
Organization Settings → Connector section — Add button visible in top right - Choose Custom, then Web
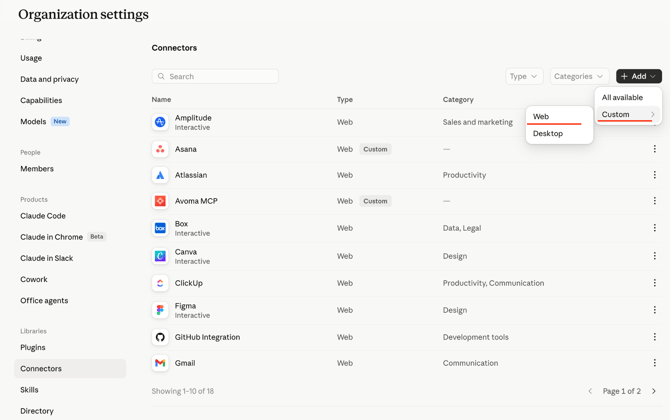
Add connector dialog — Custom and Web options - Enter Avoma MCP as the name.
- Paste this URL: https://mcp.avoma.com/mcp as the remove MCP server URL
- Click Add. Avoma MCP now appears in your Connector list.
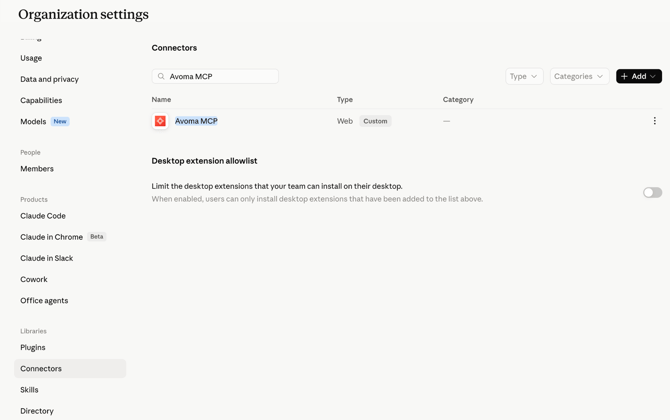
Connector list — Avoma MCP entry visible after being added
Step 2: Publish Avoma MCP to your team
Once configured, Avoma MCP is automatically available to all team members. They can access it through their own Claude settings without any additional admin action.
NOTE: Publishing is automatic. Once you add the connector, it becomes available to all team members in their Claude across all devices. No further steps are required from you.
How team members connect
After an admin publishes Avoma MCP, team members can find and connect to it directly from their Claude. The connector appears automatically; there is nothing additional the admin needs to do.
Tip: If a team member can’t find the connector, ask them to refresh their Claude settings page. It should appear automatically under customize.
Troubleshooting and FAQs
I don’t see Organization Settings in Claude. What’s wrong?
Organization Settings is only visible to org admins. If you don’t see this option, you likely have a member-level role. Contact your Claude org admin to complete the setup.
A team member says they can’t find Avoma MCP in their Claude settings.
Ask them to refresh their Claude settings page. The connector should appear automatically after you’ve added it. If it still doesn’t appear, confirm the connector was saved correctly by checking the Connector list in Organization Settings.
The URL I pasted isn’t being accepted. What should I check?
Make sure you’ve selected Custom → Web before entering the URL. The correct URL is:
https://mcp.avoma.com/mcp
Double-check there are no extra spaces or characters. If the issue persists, contact help@avoma.com.
My team members are seeing an error: "Authorization with the MCP server failed. You can check your credentials and permissions. If this persists, share this reference with support: <uuid>"
This error indicates your Avoma account does not have the access required to use the MCP connector. Avoma MCP requires an Organization or Enterprise plan, or the API Access add-on. Contact your Avoma admin to confirm your plan eligibility, or reach out to help@avoma.com with the reference ID shown in the error.
Avoma MCP is not responding or requests are timing out.
Check the following in order:
- LLM provider status — The issue may be on the AI provider's end, not Avoma's. Check https://status.claude.ai (Claude) or https://status.openai.com (ChatGPT) to see if there is an active incident.
- Rate limiting — If you have been chatting for a while, you may have hit Avoma's rate limits. Wait 1–2 minutes and retry the same prompt. If it works on retry, rate limiting was the cause.
- Query too broad — Queries spanning a very large number of meetings can exceed timeout limits. Narrow your query with a specific timeframe, meeting type, or company name.
Avoma MCP returns no results for a meeting that exists.
This is likely a scope or access issue. The OAuth scope selected during setup controls which meetings the connector can access. Common causes:
- You are trying to access a private meeting but are on a user-limited or org-limited scope, which excludes private meetings.
- You are trying to access a meeting not shared with you, which falls outside your permitted scope.
- You referenced a direct Avoma meeting link for a meeting outside your access.
To fix: go to your connector settings and review or update the OAuth scope. If the meeting belongs to another user and is set to private, an Avoma admin may need to adjust visibility on the meeting itself.
Avoma MCP stopped working after it was previously connected.
Two common causes:
- Automatic disconnection — The connector disconnects automatically after 30 days of inactivity. Reconnect from your connector settings by clicking Connect and completing OAuth again.
- Admin republished the connector — If your org admin made changes and republished the connector, all members need to reauthenticate. Follow the same reconnection steps.
What's next
- Let your team know Avoma MCP is available in Claude.
- Explore what your team can do with meeting data and insights directly in Claude.
- Contact help@avoma.com if you need help with your Avoma account or MCP setup.
Recap
You’ve added Avoma MCP as a custom connector in Claude and published it to your team. Team members can now access Avoma meeting data and insights directly from Claude on any device.
Related articles
- How members can connect & use the Avoma MCP Connector in Claude
- How admins can add the Avoma MCP Connector in ChatGPT
- How members can connect & use the Avoma MCP Connector in ChatGPT
- Use Avoma MCP in Claude & ChatGPT — Start Here
If you have any questions, contact our team at help@avoma.com