Data pushed by Avoma Router to HubSpot and Salesforce
When prospects interact with Avoma router, Avoma updates your CRM with the information about the prospect and the meeting they book.
Table of Contents
Data pushed to HubSpot by Avoma Router :
The Avoma router has the capability to push prospect details to the contact object in HubSpot, as long as the necessary fields are created for the HubSpot contact object. Additionally, when a meeting is booked, the Avoma router automatically creates a meeting and associates it with the contact that booked the meeting. Any updates made to the meeting in Avoma will also be reflected in HubSpot.
HubSpot Contact custom properties
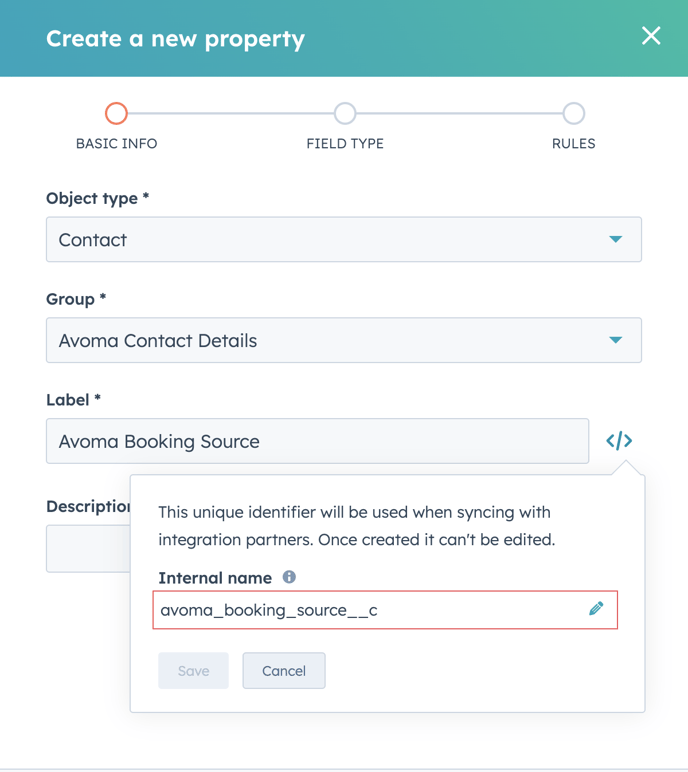
HubSpot admins will need to create the following fields against HubSpot contact so that Avoma can update these fields with the latest information. For better organization, you can group them under a separate group . For e.g "Avoma Contact Details", "Avoma Meeting Details"
In order to ensure correct updation of fields, the names and internal names of these fields will have to be exactly as suggested below -
-
Avoma Booking Source : This will be the name of the Router.
-
Field label : Avoma Booking Source
-
Internal Field Name : avoma_booking_source
-
Field Type : Text Field
-
-
Avoma Booking Status : The value of this property will be “Booked” when the prospect books a meeting after form submission and “Abandoned” when the prospect fills a form but does not book a meeting.
-
Field label : Avoma Booking Status
-
Internal Field Name : avoma_booking_status
-
Field Type: Text Field
-
-
Avoma Meeting Creation Date : The date-time of the most recent meeting created through Router.
-
Field label : Avoma Meeting Creation Date
-
Internal Field Name : avoma_meeting_creation_date
-
Field Type : Date Field
-
-
Avoma Meeting Outcome : The outcome of the most recent meeting that was created through Router as updated in Avoma .
-
Field label : Avoma Meeting Outcome
-
Internal Field Name : avoma_meeting_outcome
-
Field Type : Text Field
-
Importing these HubSpot custom properties in Avoma
Once you've created these properties in HubSpot, you will need to import these properties in Avoma .
1. Go to Avoma > Settings > CRM and click on Configure against HubSpot card
2. Go to Objects tab and Click "Configure" against the Contact object
3. Click on Import Properties . It will pull up a drawer and list all the contact properties. Select the above configured properties and click Import

That's it! After this, Avoma will start writing values to these properties as and when leads book meetings through router or abandon the process.
These properties allow you to create customized workflows in HubSpot. For example, you can set up a workflow to automatically start an email sequence if the Avoma Booking status is "Abandoned".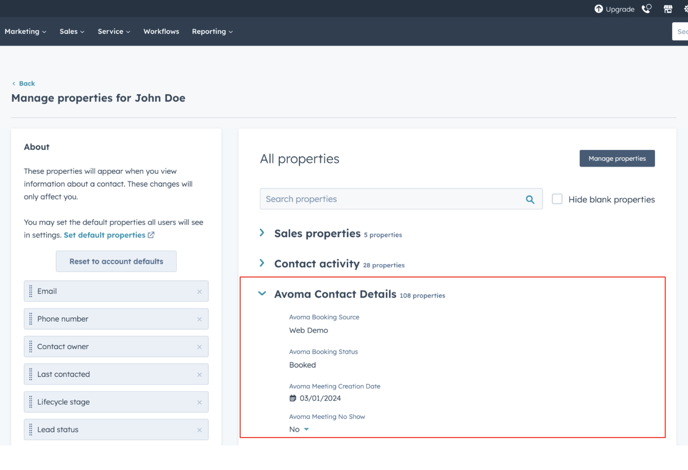
HubSpot Meeting Engagement
The Avoma router is also capable of generating a Meeting engagement in HubSpot when a prospect schedules a meeting after submitting a form. This functionality is based on a configuration setting in the "Advanced Settings" section of the router.
Note : If your reps have enabled the calendar sync with HubSpot, and if the above configuration setting is also enabled, it will create duplicate events in HubSpot. However, the one that is created through calendar sync will not have Meeting Type and Outcome set. These fields could be used to ignore these Meeting Engagement records in reporting or segmentation.
The meeting engagement will be updated with the following properties
-
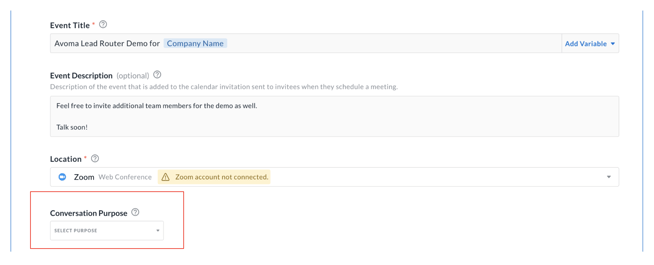
Meeting Type : The purpose of the scheduling page that was shown to the lead . To ensure a valid value for this property, please ensure that all the scheduling pages that will be used in the router have the conversation type field set.
-
Outcome : When the meeting engagement is created, this will be updated to Scheduled. The values this property can take are - Scheduled, Rescheduled, Canceled, No-Show or any other outcome based on the meeting outcome in Avoma.
-
Duration : Auto-calculated by subtracting the meeting start time and end times.
-
Meeting Title : Event title that is configured for each scheduling page that is used in Avoma router as a route.
-
Meeting Description : Event description that is configured for each scheduling page that is used in Avoma router as a route.
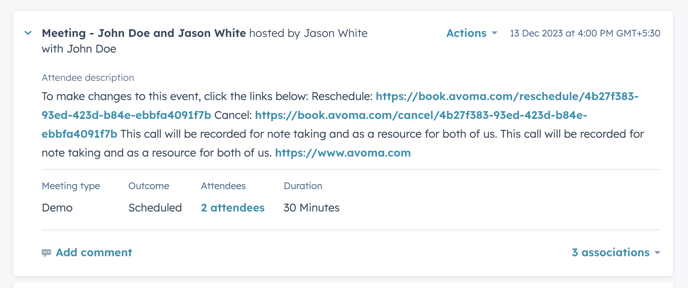
Any updates made to the outcome for this meeting engagement will also be synced back to Avoma.
Data pushed to Salesforce by Avoma Router :
Avoma router can push lead/contact details to Salesforce provided the required fields are created in Salesforce.
Salesforce Lead/Contact custom fields :
In order for Avoma to update the necessary fields with the latest information, Salesforce administrators will need to create the following fields against Salesforce Lead/Contact. To ensure proper updating of fields, it is important to use the suggested names and internal names listed below -
-
Avoma Booking Source
-
Field Label : Avoma Booking Source
-
Internal Field Name : Avoma_Booking_Source__c
-
Field Type : Text (100)
-
-
Avoma Booking Status
-
Field Label : Avoma Booking Status
-
Internal Field Name : Avoma_Booking_Status__c
-
Field Type : Text (100)
-
-
Avoma Meeting Creation Date
-
Field Label : Avoma Meeting Creation Date
-
Internal Field Name : Avoma_Meeting_Creation_Date__c
-
Field Type: Date
-
-
Avoma Meeting Outcome
-
Field Label : Avoma Meeting Outcome
-
Internal Field Name : Avoma_Meeting_Outcome__c
-
Field Type: Text (100)
-
Importing these Salesforce custom properties in Avoma
Once you've created these properties in Salesforce, you will need to import these properties in Avoma .
1. Go to Avoma > Settings > CRM and click configure against the Salesforce card.
2. Go to Objects tab and Click "Configure" against the Lead object.
3. Click on Import Properties . It will pull up a drawer and list all the Lead properties. Select the above configured properties and click Import
4. Repeat the same process for Contact object
Salesforce Meeting Event
The Avoma router is also capable of generating a meeting event in Salesforce when a prospect schedules a meeting after submitting a form. This functionality is based on a configuration setting in the "Advanced Settings" section of the router.
The meeting event will be updated with the following properties
-
Subject : This will be the title of the meeting event as configured in Avoma.
- Start : This will be the meeting start time as written by Avoma
- End : This will be the meeting end time as written by Avoma
- Description: This will be the event description as configured in the Event Description field in the scheduling page through which this event was booked.
- Assigned To: This will be the host of the meeting.
- Type : The type of this event will be "Meeting"
- Name : This will contain the name of associated lead or contact.
- Related To : This will contain the name of associated account or deal.
Along with the above properties, Avoma also writes two more properties to this event - Avoma Meeting Type and Avoma Meeting Outcome.
It is important to note that these properties are custom fields and must be created in Salesforce for Activiy object. Once created, they can be added to the Event page layout. To create custom fields for Avoma Meeting Type and Avoma Meeting Outcome, please follow the steps below.
- In your Salesforce account, go to the Setup area.
- In the platform tools section, click Objects and Fields > Object Manager
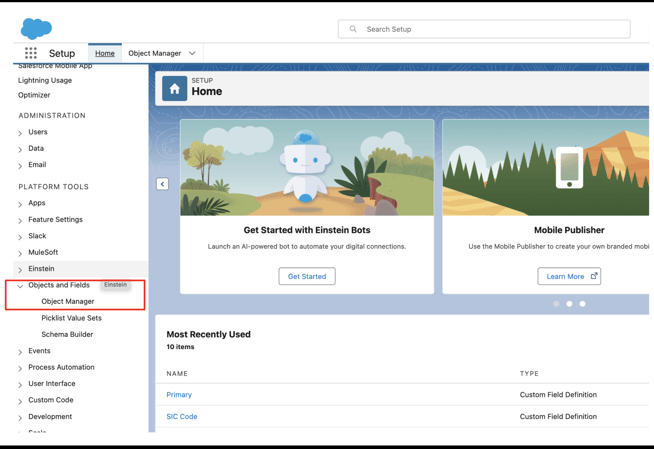
- In the Object Manager list, select Activity.
- In the activity configuration, click on Fields and Relationships and create two new custom fields

- Please ensure that these two new fields adhere to the following configuration :
- Avoma Meeting Type
- Field Label : Avoma Meeting Type
- Field Name : Avoma_Meeting_Type
- Field Type : Text (100)
- Internal Field Name : Avoma_Meeting_Type__c
- Avoma Meeting Outcome
- Field label : Avoma Meeting Outcome
- Field Name : Avoma_Meeting_Outcome
- Field Type : Text (100)
- Internal Field Name : Avoma_Meeting_Outcome__c
- Avoma Meeting Type
- After creating these two fields, go back to Object Manager and in the Object Manager list, select Event.
- In the Event configuration, go to Page Layout > Event layout to edit the event layout.
- To include Avoma Meeting Type and Avoma Meeting Outcome in the event layout, simply drag the two custom fields you created earlier from the Fields section to the Event Detail section.
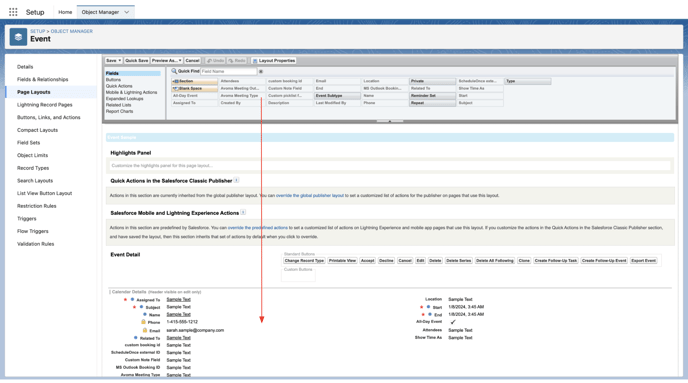
After completing these steps, Avoma will automatically update the event properties whenever a meeting is booked through the Avoma Router.