
Agent Builder lets you build AI agents that start on a trigger, work with your meeting and deal data, and take action—such as updating a CRM field or sending a Slack message.
This article covers how to create an agent, set up each step, test and publish it, and track its performance.
|
Before you begin
|
Key sections
- The Agents page
- Create an agent
- Set meetings scope for agents
- Set privacy for agents
- Test and publish your agent
- Review drafts in Needs review
- Track agent performance
- Troubleshooting and FAQs
The Agents page
To open Agent Builder, click Agents in the left navigation. The Agents page has four tabs:
- Overview: Your starting point for building and reviewing agents.
- Agents: Browse and open the agents you and your team have created.
- Needs review: Review and send drafts that agents created, such as Slack messages or emails.
- Insights: See activity and performance across all your agents.
Your credit balance, the agent search bar, and the New agent button sit at the top of the page. Click How agents work for an in-product overview.
What's on the Overview tab
- Describe the agent you want to build: Type a description to have Ask Avoma build an agent. Suggested prompts appear under Not sure where to start? Try one of these.
- Needs your review: Drafts from your agents that are waiting to be reviewed and sent.
- Your recent runs: Your agents’ latest runs.
- Continue your drafts: Agents you’ve saved as drafts but haven’t published yet.
- Latest agents by your teammates: Agents your teammates recently created and shared.
- Explore default agents: Pre-built agents you can use as a starting point.
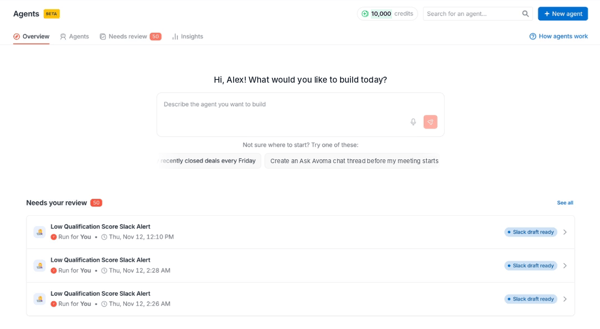
Agents → Overview: the describe-an-agent box with suggested prompts, and Needs your review
Create an agent
You can describe the agent to Ask Avoma, start from a default agent, or build it yourself in the flow builder. Everything Ask Avoma builds stays editable.
1. Describe the agent to Ask Avoma
- Go to Agents → Overview.
- In the Describe the agent you want to build box, write what the agent should do and when, or click one of the suggested prompts.
- Send the description. The Create an agent page opens, and Ask Avoma sets up the agent in the panel on the right. If it needs more detail, it asks a few clarifying questions.
- Review the draft agent: its name, description, meetings scope, trigger, filters, prompt, and action. Ask Avoma also explains any choices it made for you, such as how many minutes before a meeting the agent runs.
- To change something, type it in the Tell the assistant what to change box, and Ask Avoma updates the agent.
- Choose what to do next: Continue in builder to edit each step, Save as draft, Publish, or Discard.
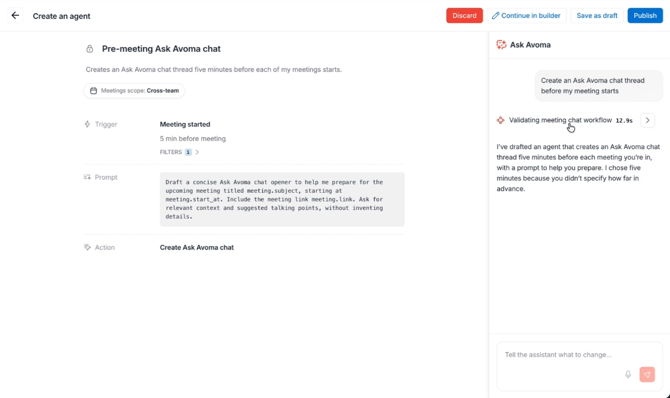
Create an agent: the draft agent from Ask Avoma, with Continue in builder, Save as draft, and Publish at the top right
Tip: Say what the output should include and when the agent should not act. For example: “Do not send an alert if the meeting has no associated deal.”
2. Start from default agent
On the Overview tab, go to Explore default agents. Pick a pre-built agent, such as a sales-to-CS handoff or a pre-meeting brief, and adjust it to fit your process.
3. Build the agent in the flow builder
- Click New agent at the top right of the Agents page.
- Click on Flow builder.
- Set up each step yourself: The trigger, prompt steps, workflow logic, and actions. See Set up your agent below.
Set up your agent
The flow builder opens on the Build tab.
Each step appears as a card on the canvas, from the trigger at the top to End at the bottom.
Click a card to edit it in the panel on the right, or click + between cards to add a step.
The Ask Avoma panel stays open on the right, so you can keep refining the agent in chat.
Choose a trigger event
The trigger event starts the agent. Choose when its workflow should run.
|
Trigger |
When it runs |
|---|---|
|
Meeting ended |
When the transcript is available |
|
Meeting started |
At or before the start of a meeting |
|
Deal created or updated |
When a new deal is created or a tracked field changes |
|
Deals on a schedule |
On a schedule, for deals that match your criteria |
|
On a schedule |
On a recurring frequency you set |
Depending on the trigger, set its timing. For Meeting started, for example, enter how many minutes before the meeting the agent runs, or 0 to run at the start of the meeting.
Under Filters, click Edit to narrow which meetings or deals the agent runs on, for example only your own meetings or only deals over $20K.
Available outputs lists the data from the trigger that you can use in prompts and actions.
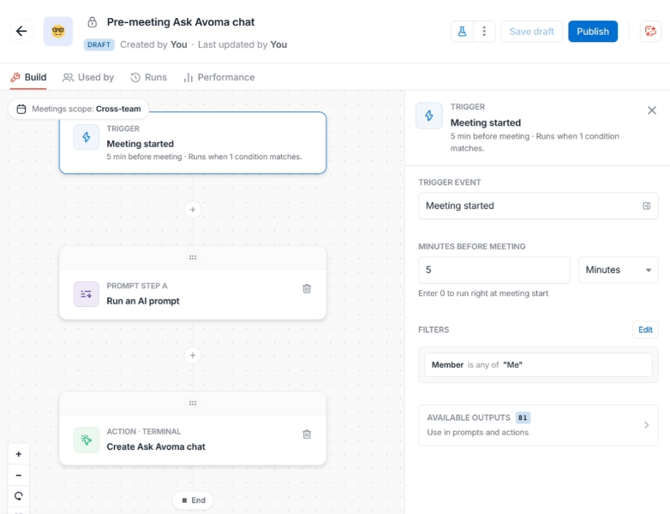
Build tab: a trigger card selected, with Trigger event, timing, Filters, and Available outputs in the right panel
Add steps and workflow logic
A prompt step (Run an AI prompt) tells the agent what to do with the data, including its role, goal, and what the output should include. In the prompt panel:
- Insert variable: Adds data from the trigger, such as the meeting subject or meeting link. You can also type {{ to insert a variable.
- Prompt library: Starts from one of 50+ saved prompts.
- Refine: Rewrites the prompt with AI. Choose Make it structured, Add intent and output, or Expand for deeper insights.
- Output format: Click Configure outputs to define what the step returns for later steps.
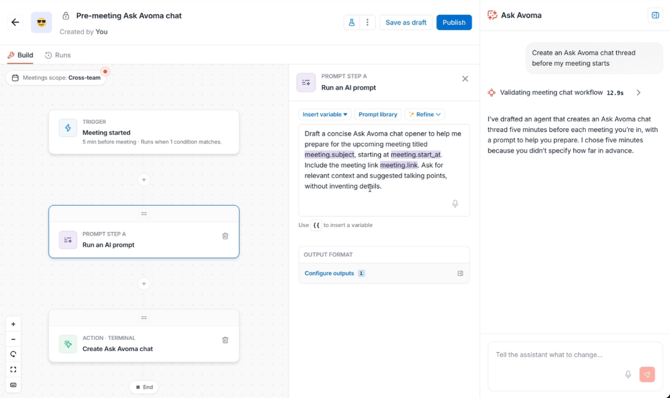
Build tab: a prompt step open, with Insert variable, Prompt library, Refine, and Output format
To add a step, click + between two cards. The Add next step menu has these options as of now with more coming soon:
|
Step |
What it does |
|---|---|
|
Parallel path |
Steps on each path run at the same time |
|
If / else |
Splits into two paths based on a condition |
|
Prompt |
Asks AI to analyze or summarize |
|
Action |
Creates a chat, sends an email, and more |
|
Delay |
Waits before running the next step |
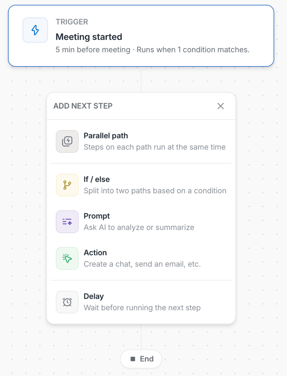
Build tab: the Add next step menu
Choose an action
Actions conclude a branch after the trigger, prompts, and any earlier steps on that path have completed.
Add parallel path to run more than one action. In the action panel, use Insert variable to add a prompt step’s output to the message.
|
Action |
What it does |
|---|---|
|
Create Ask Avoma chat |
Starts an Ask Avoma chat with the agent’s output |
|
Send an email |
Emails you, your team, or specific teammates, such as a digest, through the Gmail integration |
|
Send to Slack |
Sends an alert through the Slack integration |
|
Send to Teams |
Sends an alert through the Microsoft Teams integration |
|
Update CRM field |
Writes the agent’s output to a CRM field, including custom and AI fields. Pick the field by name, with no field ID needed. |
Choose delivery settings
For email, Slack, and Teams actions, choose how the agent delivers its output:
- Save as draft: The agent creates a draft that waits in Needs review. Someone needs to review and send it.
- Send immediately: The agent sends the message as soon as the run completes.
Note: Drafts are not sent on their own. If you choose Save as draft, check the Needs review tab to send them.
Set meetings scope for agents
The meetings scope sets which meetings the agent can work with. The current scope shows at the top left of the Build tab.
|
Scope |
What the agent can access |
Best for |
|---|---|---|
|
Personal |
All meetings you can access, including private meetings |
Personal workflows like coaching, meeting summaries, and follow-up tasks |
|
Cross-team |
Organization and publicly visible meetings only. Private meetings are excluded. |
Cross-team workflows that analyze organization-wide meeting data, such as bug reporting, risk tracking, and CRM sync |
Personal agents ask for extra confirmation before they:
- Send emails to other people
- Post to a public Slack channel
- Post to a public Teams channel
- Create HubSpot or ClickUp tasks
Warning: Meetings scope is locked once the agent is published. To change it later, create a new agent.
Under Privacy & access, choose who can edit and run the agent: Only me or Anyone in my organization. Share an agent that works so teammates can reuse it instead of building their own.
Test and publish your agent
- Click the Test icon at the top right of the editor.
- If the agent hasn’t been saved yet, Avoma asks you to save it as a draft first. Click Save & test.
- In the Test this agent panel, click Choose a meeting or deal and pick one. The list only shows meetings and deals that match the agent’s trigger rules.
- Review the output and check it against the source meeting or deal.
- Adjust the trigger, prompt, or actions if the output isn’t what you expect, then test again.
- Click Save as draft to save your changes without turning the agent on, or Publish to start running it.

Agent editor: the Test icon at the top right, next to Save and Publish
Tip: Start new agents with delivery set to Save as draft. Review a few drafts in Needs review, then switch to Send immediately once the output looks right.
Review drafts in Needs review
When an action’s delivery is set to Save as draft, the draft waits in Needs review until someone sends it.
- Go to Agents → Needs review. The number on the tab shows how many drafts are waiting.
- Open a draft.
- Check the recipients, subject, and body. Click Add recipients or edit the text if needed.
- Click the send button, for example Send to Slack.
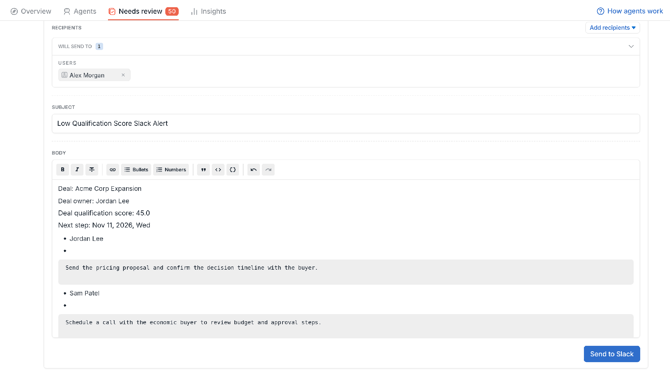
Agents → Needs review: a Slack draft with Recipients, Subject, Body, and Send to Slack
Track agent performance
For one agent
Open the agent and use the tabs at the top of the editor:
- Runs: Lists each run with who it ran for, when it ran, and how many credits it used. Open a run to see what the agent did on each deal. Filter by person, outcome, and date.
- Performance: Shows the number of runs, success rate, and average latency for the date range you pick.
- Used by: Shows how many people use the agent.
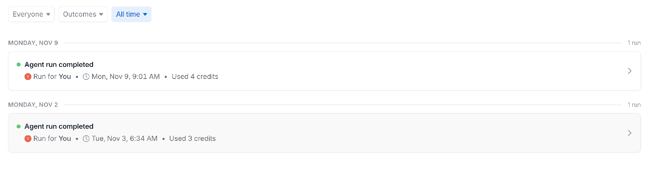
Agent editor → Runs: completed runs with credits used
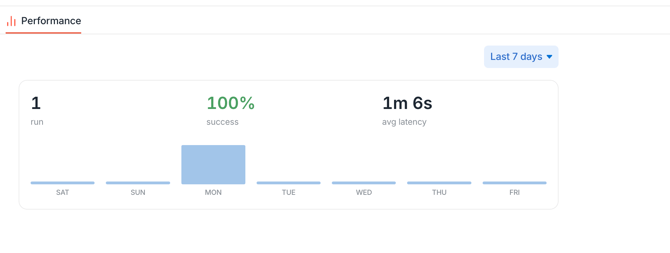
Agent editor → Performance: runs, success rate, and average latency for the last 7 days
For all agents
Go to Agents → Insights for team-level analytics: how many agents are active, how often they run and succeed, and your top agents and top members.
Switch between Activity and Performance, and filter by runs, agent, outcome, and date range.

Agents → Insights: Activity and Performance views with filters
Troubleshooting and FAQs
Why didn’t my agent send its Slack message, Teams message, or email?
The action’s delivery is likely set to Save as draft. Drafts wait in Needs review until someone sends them.
- Go to Agents → Needs review and send the draft.
- To send automatically, change the action’s delivery setting to Send immediately.
Why can’t I change my agent’s meetings scope?
The meetings scope is locked once an agent is published. Create a new agent with the scope you need.
Why doesn’t my agent use private meetings?
Agents with Cross-team scope exclude private meetings. Use Personal scope for workflows that need your private meetings.
Why can’t I add a Send to Slack, Send to Teams, or Send an email action?
These actions need the matching integration. Connect Slack, Microsoft Teams, or Gmail to Avoma, then add the action again.
How many credits does an agent use?
Credits vary by run. Open the agent’s Runs tab to see how many credits each run used. Your remaining balance shows at the top of the Agents page.
What’s next
- Publish your first agent with delivery set to Save as draft and review its drafts for a few days.
- Check the agent’s Performance tab after its first week of runs.
- Share agents that work by setting Privacy & access to Anyone in my organization.
Recap
You’ve created an agent, set its trigger, steps, actions, and scope, tested and published it, and know where to review drafts and track performance.
Related reading
If you have any questions, contact our team at help@avoma.com