Avoma is already recording and transcribing your meeting in the background. Bookmarking helps you flag specific points so they’re easier to find, summarize, and organize in your notes later.
What are Live Bookmarks?
During a meeting, you’ll see floating Bookmark buttons at the bottom of your notes. When something important comes up (like an objection, a request, or next steps), click the matching bookmark. Avoma will:
- Timestamp the moment
- Transcribe the surrounding dialogue
- Summarize it into a concise note
- Auto-categorize it under the relevant Smart Category
This way, your notes aren’t just automatic but they’re also tailored to what matters to you the most.
Who can use this feature?
Live Bookmarks are available to all Avoma users on plans.
Zoom Live Bookmarking requires:
- A licensed Zoom account connected to Avoma
- Zoom Cloud Recording enabled
- Live Streaming enabled in your Zoom settings
Note :
- Only Avoma Admins can create and manage Bookmark Categories or Topics?.
- To connect your Zoom account to Avoma, go to Zoom Integration Settings.
- Zoom setup and Bookmark configuration instructions are covered below in this article.
How to use Live Bookmarks during a meeting
How to Use Live Bookmarks During a Meeting
1. Open the meeting from your Upcoming Meetings tab
- Go to the Upcoming Meetings tab in Avoma.
- Click on the meeting that is being recorded, this will take you to the notes template for that meeting.

2. Access the notes template for the meeting
- Once the meeting page opens, you’ll land on the notes editor with the default template. This is where your real-time transcription, notes, and bookmarks will appear.

3. Click a Bookmark from the panel to capture an important moment
- On the bottom-right corner, you'll see a floating Bookmarks panel.
- Each button represents a Smart Topic like Action Items, Risk, or Product Feedback (set up by your Admin).
- When something important comes up, just click the matching button. Avoma will tag that moment and later extract and summarize the context.

4. Platform-specific behavior
- Avoma Notetaker: You’ll see the transcript update in real time.
- Zoom/Webex: A "Bookmark Added" message will appear. The captured content will be added once the meeting is transcribed.
Bookmark Faster with the Avoma Desktop App
The easiest way to use Live Bookmarks is through the Avoma Desktop App.
It lets you join meetings, open your notes, and click bookmarks, without switching tabs or windows.
If you regularly take live notes or flag moments during calls, the desktop app offers the fastest experience.
What happens after the call?
Once your meeting is transcribed, Avoma will:
- Extract the transcript around your bookmarked moment
- Summarize it into a concise, readable note
- Add a timestamp linked to that moment in the recording
- Organize it under the Smart Topics used for the Bookmark
How to set up Bookmark Topics (For Admins)
Avoma Admins can create Smart Categories that appear as Bookmark buttons in meetings.
To set up:
1. Go to Settings → Organization → Smart Topic
2. Click + New Smart Topic
3. Name the topics (e.g. “Feature Requests”, “Pricing”, “Objection”)

4. Toggle ON to enable it for Bookmarking
5. Configure:
- What transcript text to extract
- How much context to include before and after the moment
Once added, this Smart Category will show up as a Live Bookmark for all recorded meetings.
How to enable Live Bookmarking in Zoom
To use Live Bookmarks inside Zoom meetings, follow these steps:
1. Make sure your Zoom account is:
- Licensed
- Connected to Avoma
- Using Cloud Recording
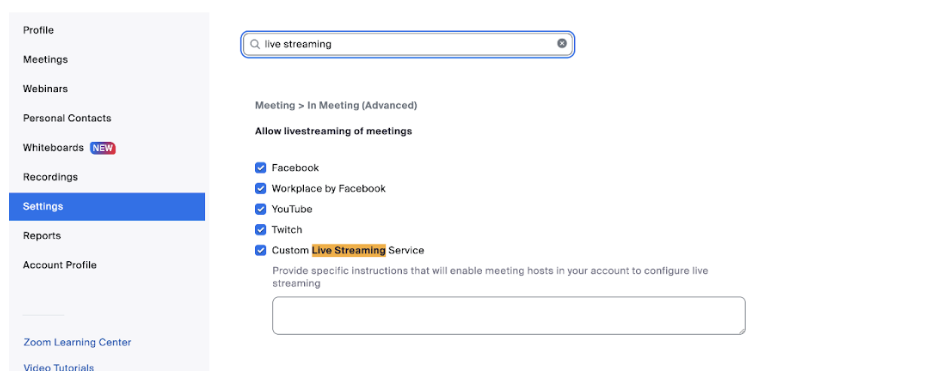
2. Enable live streaming in Zoom
This is required for bookmarking to work. Participants will also see a banner indicating the meeting is being live streamed via Avoma. Here’s how you can configure Live Streaming in Zoom.
3. Accept Zoom prompts
Participants must accept both the recording and live streaming notices at the start of the meeting.
We recommend keeping all other Avoma recording and transcription settings turned ON for full functionality.
All other automatic and cloud recording options in Avoma should be left ON as before.
Zoom Live Bookmarking will only work for licensed Zoom users who have their Zoom accounts connected to Avoma, and are currently using cloud recording.
If you have any additional questions, please contact our team at help@avoma.com.