Lead routing in Avoma Scheduler helps you automatically route inbound leads to the right sales rep based on form responses and CRM ownership.
This article is for Admins on the Business plan who want to connect HubSpot or Marketo forms to Avoma and route leads to the correct scheduling page without manual work.
What is lead routing in Avoma?
Lead routing lets you:
- Ask qualifying questions on your form
- Segment leads based on their responses
- Route each lead to the most relevant rep or team
For example, when a demo form is filled out, you can route the SMB leads who are looking for a few seats to an SMB round robin page and Enterprise leads to a dedicated AE. You can also ensure existing customers who filled out the form are routed to their current account owner.
Avoma Lead Routing is built directly into Avoma Scheduler, so setup and changes take minutes instead of weeks.
Before you startRequirements to setup Lead Router
|
Prepare scheduling pages for inbound lead routing
Before creating a router, you need to set up the scheduling pages that leads will be routed to.
Think of it this way: every routing segment needs a destination scheduling page. The router does not create pages for you. It only sends people to pages that already exist.
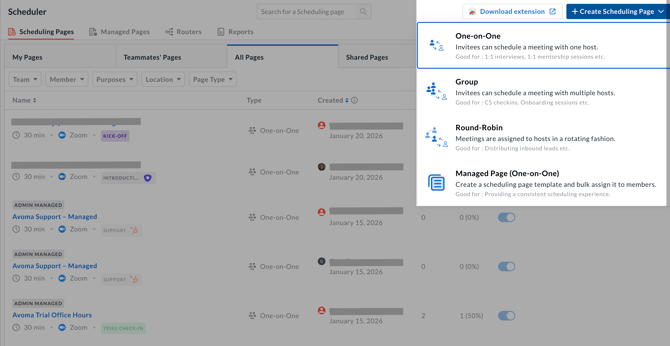
Steps to create scheduling pages:
-
Go to Avoma > Scheduler.
-
Click Create scheduling pages in the top-right corner.
-
Choose the type of scheduling page you want to create (managed, round robin, one-on-one, or group).
-
Configure the page and save it.
Repeat this process for each inbound segment you plan to route.
What scheduling pages will you need?
Set up scheduling pages based on how you plan to route visitors.
1. Create a managed page for existing customers or prospects
Use a managed page if you want to route visitors who already have an owner in your CRM. Give the page a clear internal name, such as “<Form Name> — CRM Ownership Check”, so it’s easy to identify and use in routing rules.
This page allows Avoma to:
- Identify the contact or company owner in your CRM by email or domain
- Route the visitor to the existing contact or company owner automatically
You should create a managed page and add users under Members Assigned:
- Account executives
- Account managers
- Customer Success Managers
- Or any rep who owns existing contacts or accounts
2. Create round robin pages for every inbound segments
Use round robin scheduling pages for new inbound leads that should be routed to certain reps or team instead of a specific owner. Each inbound segment you route to must have its own round robin page.
For each segment:
- Create a round robin scheduling page
- Add the reps who should receive bookings for that segment under Round Robin Members Information
- You will use that page as the destination when setting up your routing rules
Examples:
- SMB inbound leads
- Mid-market inbound leads
- Enterprise inbound leads
- Regional teams, such as US or EMEA
3. (Optional) Create one-on-one or group scheduling pages for unique cases
- One-on-one scheduling pages
Use when a segment routes to a single user. This is not recommended. In most cases, use a round robin page and add just one user. - Group scheduling pages
Use when the booking needs multiple participants on the calendar. Availability is based on the combined calendars of all participants in the group.
Important: Each segment you route to should have its own round robin page.
How to configure inbound lead routing in Avoma Scheduler
Step 1: Connect a HubSpot or Marketo form to Avoma Router
Avoma Router currently supports:
- HubSpot forms
- Marketo forms
Note: You can use these even if Salesforce is your primary CRM.
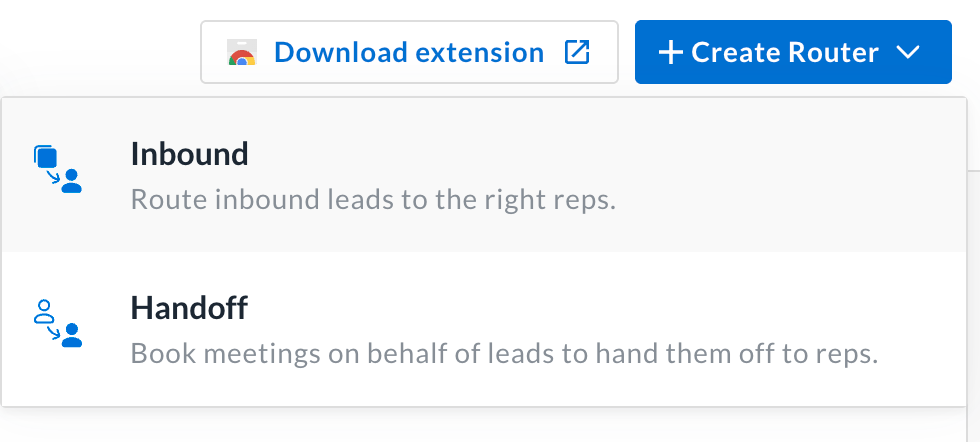
Navigate to Router
- Go to Avoma > Scheduler > Router
- Click Create Router
- Click Inbound
- Choose Import from HubSpot or Import from Marketo, depending on the form you are using
Import from HubSpot form
Important: Avoma Router supports HubSpot forms created with the Legacy editor. HubSpot’s new Form Editor does not expose the functionality needed for reliable data exchange, which is why those forms are not supported.
Steps:
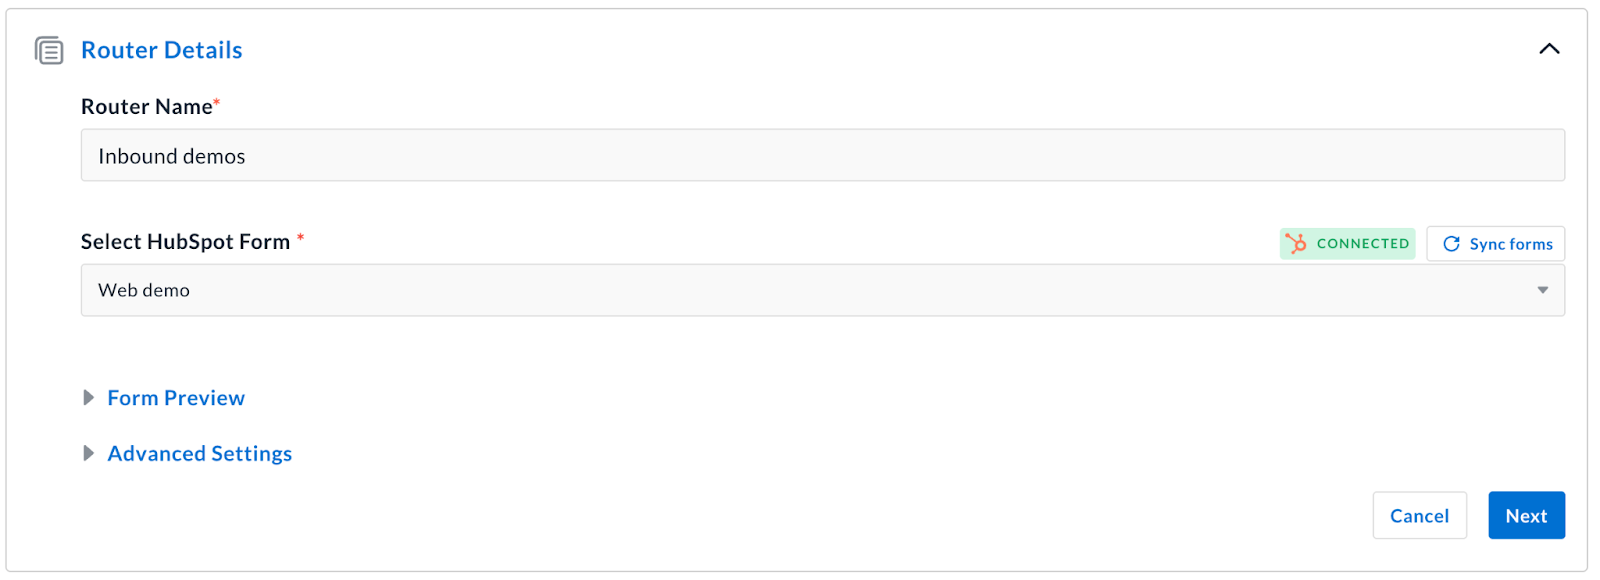
- Select Import from HubSpot
- Click Connect HubSpot if prompted
- Sign in to HubSpot and authorize Avoma
- Create a name for Router.
- Select the HubSpot form you want to use for routing from the dropdown
- Review the form preview
- Click Next and proceed to define routing rules (go to Step 2)
Import from Marketo form
You’ll need your Marketo Client ID, Client Secret, and Munchkin ID to connect your Marketo form.
- Refer to this link to learn how to find your Client ID and Client Secret
- Refer to this link to find your Munchkin ID
Steps:
- Select Import from Marketo
- Click Connect Marketo
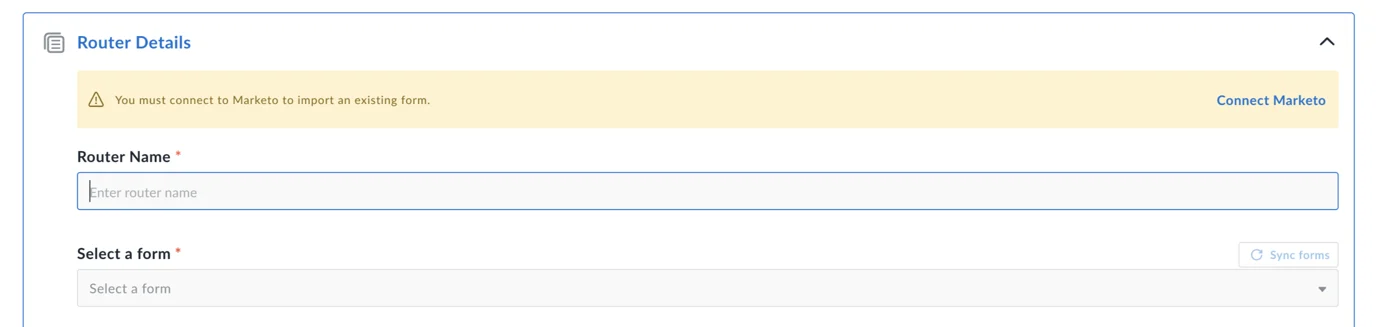
- Enter the following credentials:
- Marketo Client ID
- Marketo Client Secret
- Marketo Munchkin ID
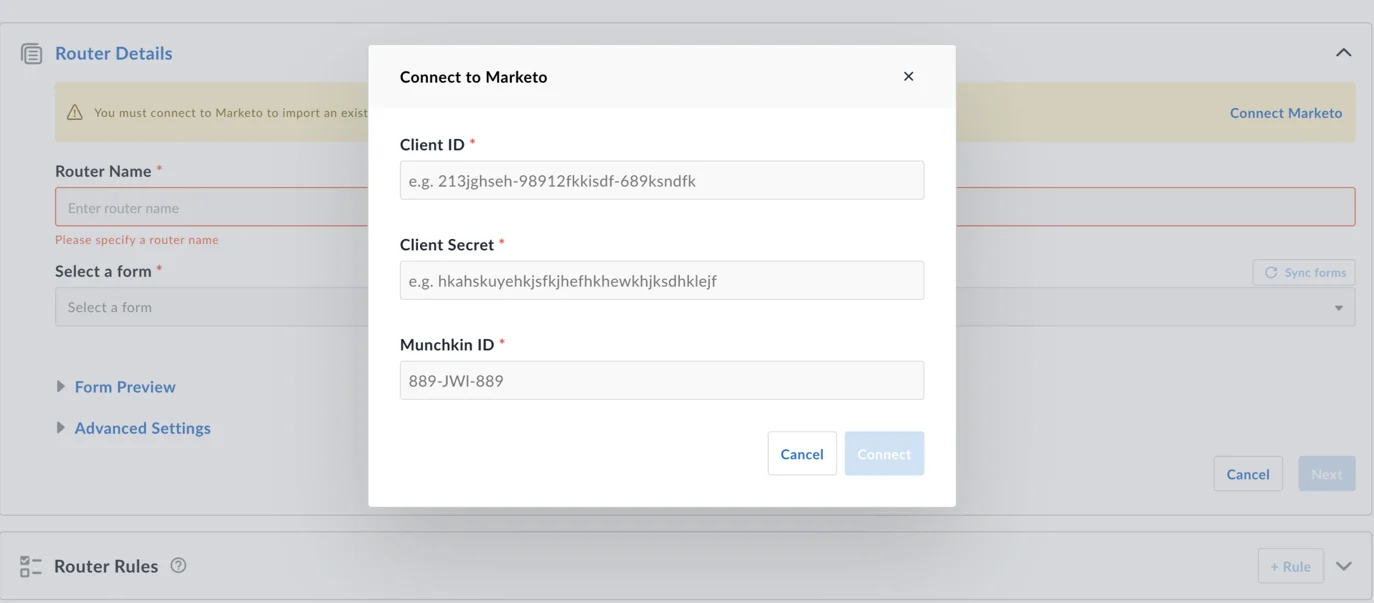
- Click Connect
- Select the Marketo form you want to use for routing from the dropdown
- Review the form preview
- Click Next and proceed to define routing rules (go to Step 2)
Step 2: Set up routing rules in Avoma
Once you select a form, Avoma automatically pulls in all form fields for routing.
Each routing rule has two parts:
- Conditions (IF) based on form fields or CRM conditions
- Route (ROUTE TO) which determines where the lead is sent
A default fallback rule is included for leads that do not qualify for any condition.
Create a routing rule
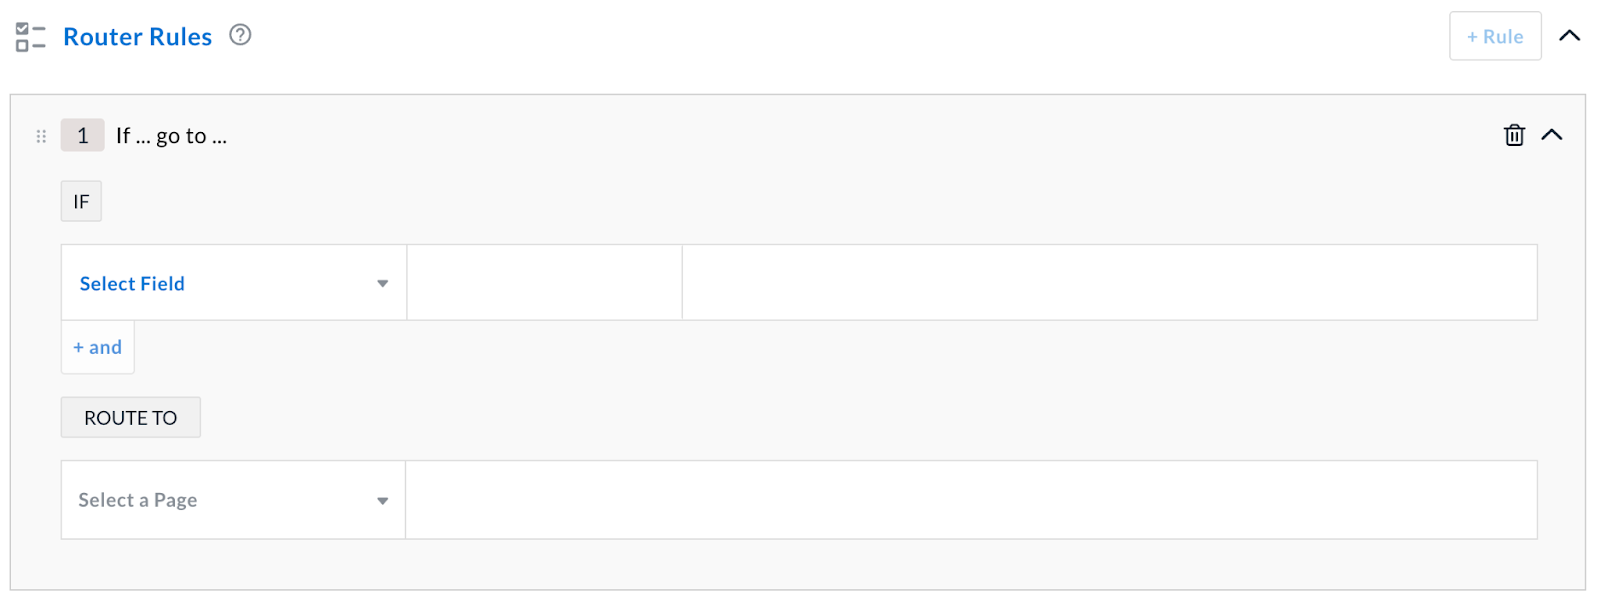
- Click + Rule
- Under Select Field, choose a form field
- Select an operator (is, is not, contains, does not contain)
- Select or enter the value that should trigger this rule
- Under ROUTE TO, select a destination:
- One-on-one page
- Round robin page (recommended for inbound routing)
- Group page
- Managed page (recommended for CRM ownership routing)
- External URL
- Click Save
Repeat this process to create multiple rules.
Example routing rules
- Company size between 1 to 50 → SMB round robin
- Region equals EMEA → EMEA round robin
- Partnership inquiry → Steve’s one-on-one page
Important: Order matters. Rules run from top to bottom. As soon as a lead qualifies for a rule, it is routed and no additional rules below are checked. Drag rules to reorder them.
Tip: Always place CRM ownership routing first, followed by high-value segments like Enterprise.
Step 3: Add CRM ownership routing (recommended)
CRM ownership routing ensures existing leads and customers are routed to their current owner.
This feature uses your CRM data and conditions to identify ownership and route accordingly.
Prerequisite for CRM ownership routing
- Create a managed page
- Assign the managed page to reps or CSMs who own accounts or contacts in your CRM
These are typically AEs, account managers, or CSMs.
Create a CRM ownership rule
- Click Add Rule
- Under Select Field, choose CRM conditions
- Select a matching criteria
- Under Route To, select a managed page
- Click Save
Important: Each rule can include only one CRM matching condition, but you can create multiple CRM-based rules. For the fastest booking experience for visitors, keep the number of CRM rules to a minimum.
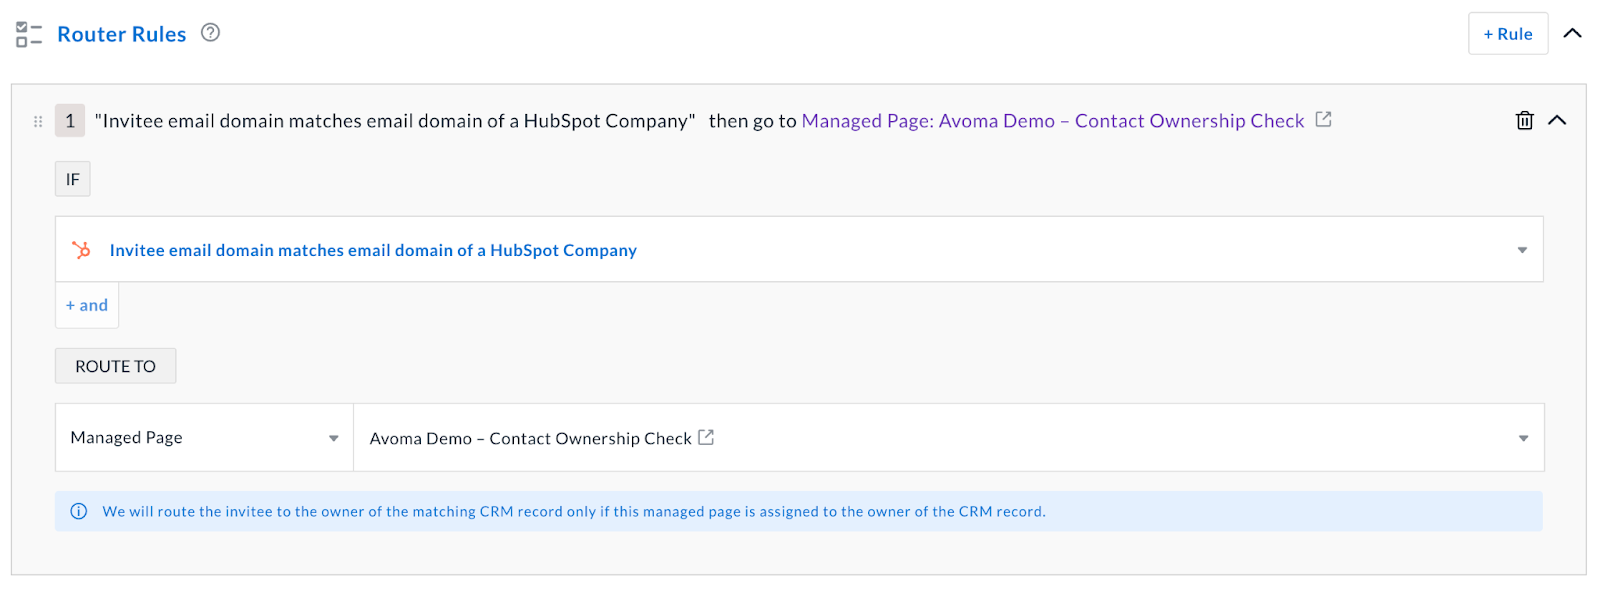
How CRM ownership routing works in Avoma
Avoma uses CRM ownership checks to route visitors to the correct owner when a matching record exists in HubSpot.
For “Invitee email domain matches email domain of an Account/Company”
- Matches the invitee’s email domain to the Company record in HubSpot or Account record in Salesforce
- Identifies the owner of the matching Company or Account record
- Routes the invitee to the owner’s scheduling page using the managed page
For “Invitee email domain matches email domain of a Contact”
- Matches the invitee’s email domain to the email domain of a HubSpot contact
- Identifies the owner of the matching HubSpot contact record
- Routes the invitee to the owner’s scheduling page using the managed page
For “Invitee email matches email of a Contact”
- Matches the invitee’s email address to a Contact record in your CRM
- Identifies the owner of the matching Contact record
- Routes the invitee to the owner’s scheduling page using the managed page
For “Invitee information matches a Deal”
- Matches the invitee’s email or domain to an existing Deal record in your CRM
- Identifies the owner of the matching Deal record
- Routes the invitee to the owner’s scheduling page using the managed page
Best practice: Place CRM ownership rules at the top so they run first.
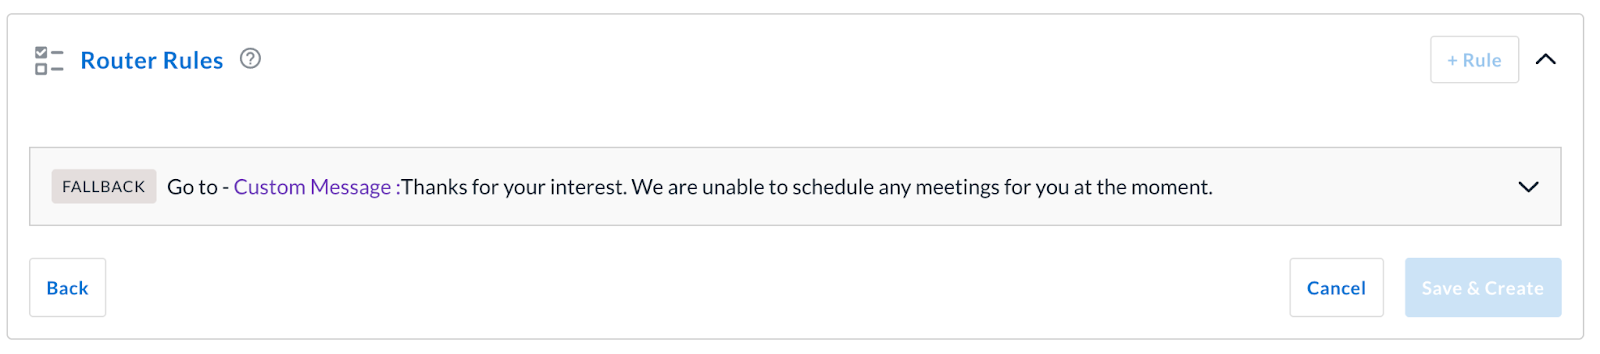
Step 4: Set up a fallback route
The fallback route is used when a visitor does not qualify for any of your routing rules.
This ensures every form submission is properly handled, even if none of the defined conditions are met.
Configure the fallback
Choose what should happen when no routing rules apply:
- Show a custom message
Display a message explaining next steps to the visitor. - Route to an external URL
Send the visitor to a specific landing page or resource. - Route to a catch-all scheduling page
Direct the visitor to a general scheduling page you select.
Best practice: Set the fallback behavior carefully. This is where disqualified or out-of-scope visitors will land. Monitor how often visitors are disqualified, and revisit your routing rules if needed.
Step 5: Embed the router on your website
Once routing rules are complete, embed the router on the same page as your form.
Embed for HubSpot forms
IMPORTANT: Disable redirects in HubSpot
To ensure the Avoma Router booking opens correctly:
- Open your HubSpot form
- Go to Options
- Set post-submit behavior to Display a thank you message
You can add redirects after booking on each Avoma scheduling page you route visitors to under Confirmation Page Preferences.
Steps to embed the router with HubSpot forms
- Open the router setup page in Avoma.
- Click Embed in the top right.
- When prompted “When do you want the router to be displayed?”, we recommend selecting After form submission.
- Copy the embed code.
- Open the webpage where your HubSpot form is embedded.
- Paste the router embed code into the page’s HTML, directly below the HubSpot form embed code.
- Save and publish the page.
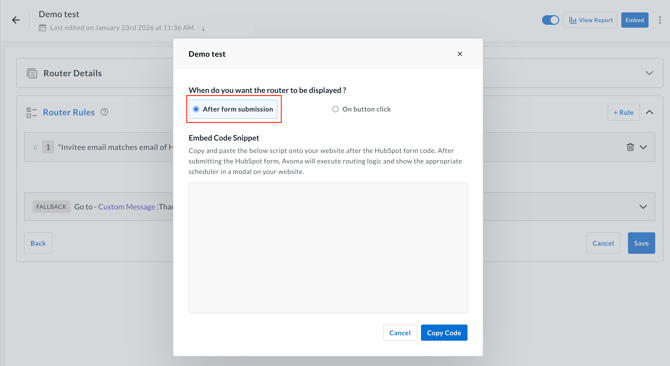
The router code must be placed on the same page (or pages) as the HubSpot form and after the form embed for routing to work correctly.
Embed for Marketo forms
IMPORTANT: Disable redirects in Marketo
To ensure the Avoma Router booking opens correctly, disable redirects after form submission in Marketo.
You can add redirects after booking on each Avoma scheduling page you route visitors to under Confirmation Page Preferences.
Steps to embed the router with Marketo forms
- Open the router setup page in Avoma.
- Click Embed in the top right.
- When prompted “When do you want the router to be displayed?”, we recommend selecting After form submission.
- Copy the embed code.
- Open the webpage where your Marketo form is embedded.
- Paste the router embed code into the page’s HTML, directly below the Marketo form embed code.
- Save and publish the page.
The router code must be placed on the same page (or pages) as the Marketo form and after the form embed for routing to work correctly.
Note: If you are using Marketo landing pages instead of embedding Marketo forms on your website, contact Avoma Support to have the router added to your Marketo landing pages.
What happens after a form submission?
- A visitor fills out your form
- Avoma qualifies them based on your routing rules
- A scheduling popup appears showing available times
- The visitor picks a time and the meeting is booked instantly
- Your CRM is automatically updated
No manual work. Instant bookings. Leads are routed to the right people. A better experience for buyers and your team.
Next steps
- Review your routing rules periodically as your team grows
- Test each rule to confirm correct routing
- Add CRM ownership routing for the best buyer experience
If you need help, contact Avoma Support or explore related Scheduler articles in the Help Center.