
The Avoma Desktop App records the audio of your calls from your Mac, so no bot joins the meeting. During the call, Live Assist shows you a live transcript, your notes and answer cards. After the call, the recording becomes a regular Avoma meeting.
Setup takes a few minutes, and there’s nothing to configure beyond the steps below.
|
Before you begin
|
Download and install the Avoma Desktop App
- Go to avoma.com/download and download the Avoma Desktop App.
- Install the app and open it.
Sign in to your Avoma account
- Open the Avoma Desktop App.
- Sign in with your Avoma account.
Note: After you sign in, a small Avoma icon stays in your Mac’s menu bar and starts when you log in to your Mac. It’s what lets the Avoma Desktop App offer to record your calls. If you quit it from the menu bar, call detection stops.
Grant the required macOS permissions
The first time you start a recording, the Avoma Desktop App shows the Enable recording permissions screen. You only see it once. All 3 permissions are required.
- Start your first recording. See How to record meetings using the Avoma Desktop App.
- On the permissions screen, click Enable next to each permission and allow access when macOS asks.
- Select the consent checkbox (see Understand recording consent requirements below).
- Click Start Recording.
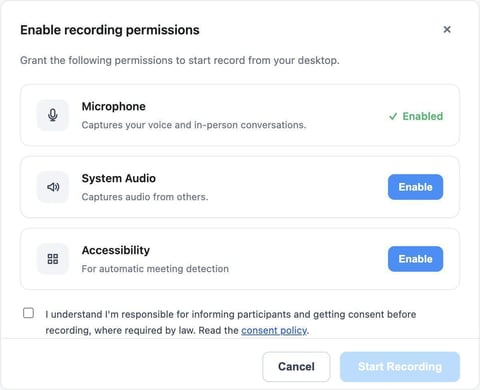
The Enable recording permissions screen, shown once before your first recording
Microphone
Captures your voice and in-person conversations.
System Audio
Captures audio from others on the call.
Accessibility
Allows the app to automatically detect when a meeting starts, prompt you to record it, and display Live Assist features during the call.
How Avoma uses these permissions
- The Avoma Desktop App doesn’t ask for Screen Recording, Camera or Calendar access. It never captures video or your screen.
- The permissions are used on your Mac to capture call audio and to detect that a call has started. Avoma doesn’t store personal information about you or your device from them.
- The meeting’s audio and transcript are sent to Avoma, the same as any other recorded meeting.
Understand recording consent requirements
Before your first recording, you need to select the checkbox I understand I’m responsible for informing participants and getting consent before recording, where required by law. The checkbox links to Avoma’s consent policy for local recording on the Avoma Desktop App.
Because nothing joins the call, participants won’t see a bot. Tell them you’re recording, or play the recording announcement from the recording widget. To learn more about consent, see Meeting recording consent: How Avoma helps you stay compliant.
Tip: The recording announcement plays a short message through your microphone, starting “This meeting is being recorded for note taking…”. See Announce recording to participants in How to use Live Assist in the Avoma Desktop App.
Verify that the desktop app is ready to use
Your Avoma Desktop App is ready when:
- The Avoma icon appears in your Mac’s menu bar.
- Microphone, System Audio and Accessibility show as enabled on the permissions screen, and you’ve selected the consent checkbox.
- When you join a Google Meet or Zoom call, a card at the top right of your screen asks if you want to record. See Record from the call-detected alert.
If a permission is missing
If you denied a permission, or the app can’t capture audio or detect calls, turn the permission back on in macOS:
- Open System Settings → Privacy & Security.
- Open Microphone, then Accessibility, and turn on access for Avoma in each.
- Quit and reopen the Avoma Desktop App, then start a recording again.
Note: On Mac, the call-detected card appears for Google Meet and Zoom only. For other call apps, start recording from Zen mode or the menu bar.
Related articles
- How to record meetings using the Avoma Desktop App
- How to use Live Assist in the Avoma Desktop App
- Consent policy for local recording on the Avoma desktop app
- How the Avoma Bot joins and records meetings
If you have any questions, contact our team at help@avoma.com.