
Avoma for Outlook is an add-in for Microsoft Outlook.
When you schedule a meeting in your Outlook calendar, the add-in turns it into a Microsoft Teams meeting and adds an Avoma join link to the invite.
Participants who join through that link see your organization's recording notice or consent request before they enter the meeting.
This article explains how the add-in works, how admins set it up, and how members use it.
|
Before you begin
|
Key sections
- How Avoma for Outlook works
- For admins: set your consent policy
- For admins: deploy the add-in to your organization
- For members: install the add-in
- For members: add an Avoma meeting to an Outlook event
- For members: connect or log out of Avoma
- Troubleshooting and FAQs
How Avoma for Outlook works
When you select Add Avoma Meeting on an Outlook event you are organizing, Avoma:
- Turns the event into a Microsoft Teams meeting.
- Adds an Avoma join link to the event's Location.
- Adds a Join Avoma Meeting section to the event description, with the Avoma join link, a backup Microsoft Teams link, and your organization's recording disclaimer.
When participants open the Avoma join link, they see a join page based on your organization's consent policy, and are then taken to the Teams meeting:
|
Consent policy |
What participants see |
What happens to the recording |
|---|---|---|
|
Acknowledgement required |
A page explaining that the meeting will be recorded and transcribed. |
The meeting is recorded by default. |
|
Permission required |
A page asking "May we record this meeting?" with Join & record meeting and Join but don't record. |
If a participant declines, the meeting is not recorded. |
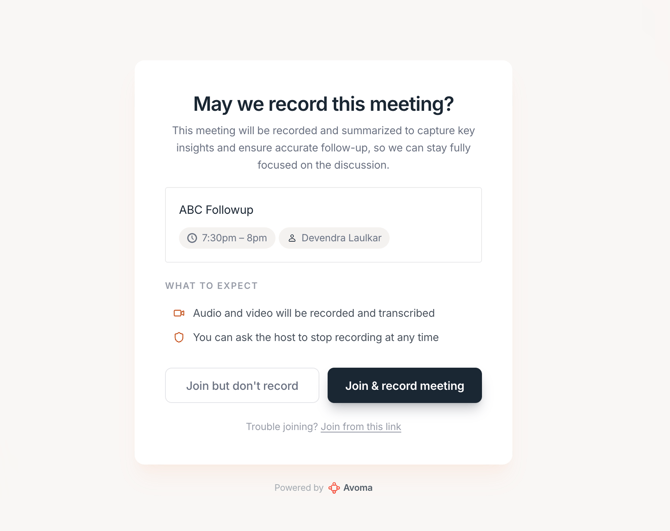
Note: Avoma for Outlook supports Microsoft Teams meetings only. It applies to meetings where an Avoma member is the organizer.
For admins: set your consent policy
The add-in requires a consent policy that shows participants a join page. Set this once for your organization.
- In Avoma, go to Settings → Consent Policies.
- Under Select recording consent mode, choose one:
- Acknowledgement required — participants acknowledge the recording before joining. The meeting is recorded by default.
- Permission required — participants explicitly accept or decline. If consent is denied, the meeting isn't recorded.
- (Optional) Turn on Disclaimer in calendar invite and edit the Disclaimer Message. The add-in adds this text to the event description.
- Click Save changes.
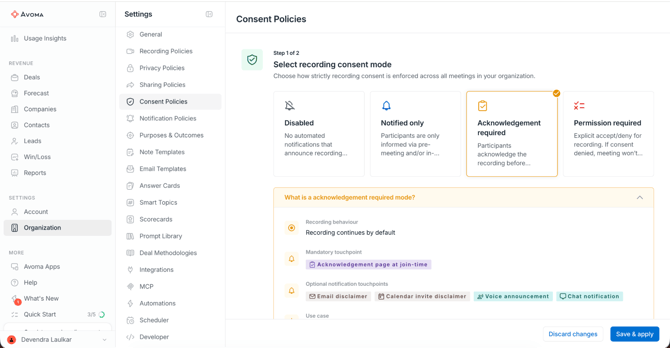
Note: The add-in doesn't work when the consent mode is Notified only or Disabled. Members see an error if they try to add an Avoma meeting.
Tip: If you don't turn on the calendar invite disclaimer, the add-in adds a standard notice: "This meeting may be recorded and processed according to Avoma's consent policy."
For additional information about recording policies in Teams, see Recording compliance and privacy for Microsoft Teams.
For admins: deploy the add-in to your organization
Deploying the add-in centrally installs it for everyone you choose, so members don't need to install it themselves.
- Sign in to the Microsoft 365 admin center as a Microsoft 365 admin.
- Go to Settings → Integrated apps.
- Click Get apps, search for Avoma for Outlook, and click Get it now.
- Choose who gets the add-in: your entire organization, or specific users or groups.
- Review the permissions and click Deploy.
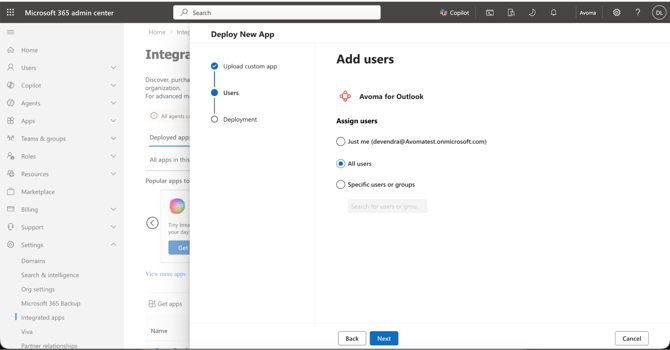
Note: Microsoft can take up to 24 hours to show a newly deployed add-in in your users' Outlook.
Tip: Deploy to a small group first, confirm that members can add an Avoma meeting, and then expand to your whole organization.
If you need help with Microsoft integration permissions, see the Microsoft admin consent workflow.
For members: install the add-in
If your admin has already deployed Avoma for Outlook, skip this section. The add-in is already in your Outlook.
- In Outlook, open the add-ins store:
- Outlook on the web and the new Outlook — select Apps, then Add apps.
- Classic Outlook — on the Home tab, select Get Add-ins.
- Search for Avoma for Outlook.
- Select Add.
Note: Some organizations don't allow members to install add-ins. If you can't add it, ask your Microsoft 365 admin to deploy it for you.
For members: add an Avoma meeting to an Outlook event
Do this once for each meeting you organize.
- In your Outlook calendar, create a new event, or open an event you organize.
- Add a title, date and time, and attendees.
- On the event toolbar, select Avoma for Outlook → Add Avoma Meeting.
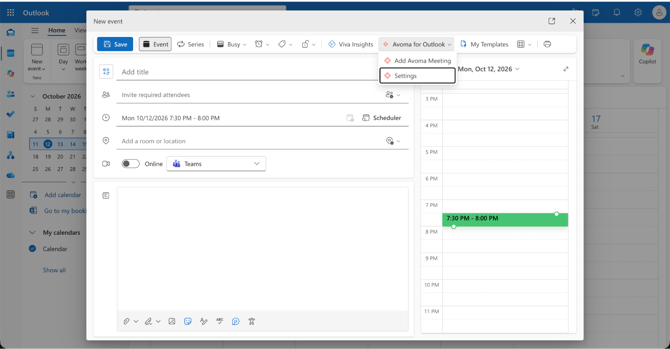
- The first time, a sign-in window opens. Sign in to Avoma the way you usually do, for example with Continue with Microsoft or your organization's single sign-on.
- Wait for the message "Avoma meeting link added to the location and description." at the top of the event.
- Review the event and select Send (or Save) to send the invitation.
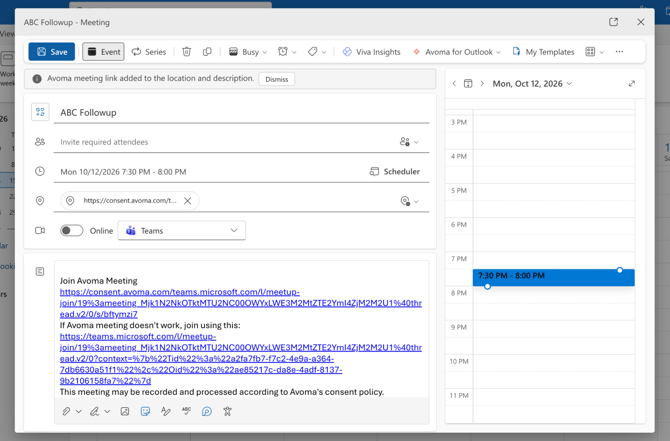
Note: Adding the Avoma meeting saves the event to your calendar, but it doesn't send the invitation. Attendees get the invitation only when you select Send.
Tips
- Rescheduling — if you change the date or time later, you don't need to add the Avoma meeting again. The link stays the same.
- Keep the Avoma section — don't delete the Join Avoma Meeting section from the description. Participants need that link to see the join page.
- In the new Outlook or on the web — if you don't see Avoma for Outlook on the toolbar, look under Apps or the … (more options) menu.
For members: connect or log out of Avoma
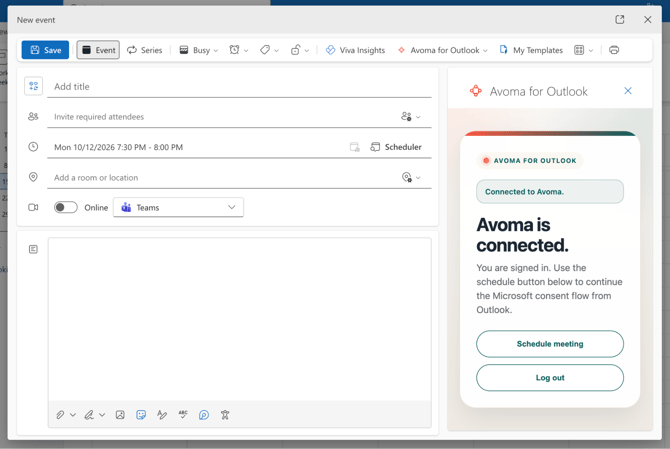
Select Avoma for Outlook → Settings on any event you organize to open the Avoma pane. From there you can:
- Connect Avoma — sign in, if you aren't connected or your session has expired.
- Schedule meeting — add the Avoma meeting to the current event, the same as Add Avoma Meeting.
- Log out — disconnect Avoma from Outlook.
Troubleshooting and FAQs
I don't see Avoma for Outlook in Outlook. What should I check?
The add-in only appears on calendar events that you organize. It doesn't appear on email messages or on invitations you received from someone else.
- Confirm that the add-in is installed, or ask your admin whether it has been deployed to you.
- If your admin just deployed it, wait up to 24 hours, then restart Outlook.
- In the new Outlook and Outlook on the web, check under Apps or the … menu on the event toolbar.
- The add-in isn't available in Outlook mobile apps.
I see "A connected Microsoft Outlook calendar is required."
Your Avoma account isn't connected to a Microsoft Outlook calendar.
- In Avoma, go to Settings → Calendar and connect your Microsoft Outlook calendar. Then try again.
I see "Consent is not enabled for this organization."
Your organization's consent policy doesn't show participants a join page.
- Ask your Avoma admin to set Settings → Consent Policies to Acknowledgement required or Permission required.
I see "Your Avoma plan does not support consent meetings."
Avoma for Outlook is available on the Enterprise plan.
- Contact your Avoma admin or your Avoma account team to upgrade.
I see "The Microsoft calendar event could not be found." or "Microsoft Teams could not create a meeting link."
Avoma couldn't reach the event in your Microsoft calendar, or Microsoft Teams didn't create the meeting.
- Wait a few seconds and select Add Avoma Meeting again.
- Confirm that your Microsoft 365 account can create Microsoft Teams meetings.
- If the problem continues, contact help@avoma.com.
I see "Your Avoma session expired. Please reconnect."
You were signed out of Avoma in Outlook.
- Select Avoma for Outlook → Settings, click Connect Avoma, and sign in again.
I see "Unable to save this event in Outlook. Please try again."
Outlook couldn't save the event before adding the Avoma meeting.
- Check that the event has a valid date and time, then try again.
I can't sign in to Avoma from the add-in.
The add-in signs in existing Avoma users only. It can't create a new Avoma account.
- Ask your Avoma admin to invite you to your organization's Avoma account.
- Sign in with the same method you use for the Avoma web app.
- If you closed the sign-in window before finishing, select Add Avoma Meeting again to reopen it.
Do I need to add the Avoma meeting again after I reschedule?
No. Add the Avoma meeting once per meeting. If you change the date or time later, the existing Avoma link keeps working.
What's next
- Admins: set your consent policy and deploy Avoma for Outlook to a pilot group.
- Members: connect your Microsoft Outlook calendar in Avoma, then add an Avoma meeting to your next Teams meeting.
- Customize the consent page title, description, logo and brand color in Settings → Consent Policies.
Recap
You've set up a consent policy, made Avoma for Outlook available to your team, and know how to add an Avoma meeting to an Outlook event so participants see your recording notice before they join.
Related articles
- Recording consent and compliance
- Calendar settings
- Recording compliance and privacy for Microsoft Teams
- Microsoft integration: Workspace-wide connection
- How Avoma joins and records your meetings
If you have any questions, contact our team at help@avoma.com