NOTE: For the best experience, please make sure to complete the Quick Start setup in Avoma's Web Platform, before using the iOS App. For guidance on the Quick Start process, check out the Avoma Quick Start Guide.
Once you have downloaded Avoma's Mobile App from the AppStore, open the Avoma App and log in using the same login email and password that you use for Avoma's Web Platform.
Navigation within the Avoma iOS App
Within the iOS interface, there are 5 main tabs, each with specific functionality that correlates to that within the Avoma Web Platform. They include
- Meetings
- Playlists
- Search
- Scheduler
- Account

Meetings
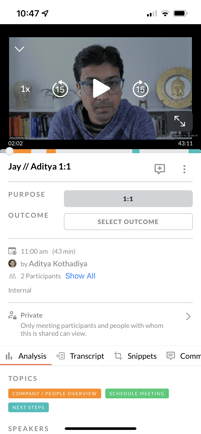
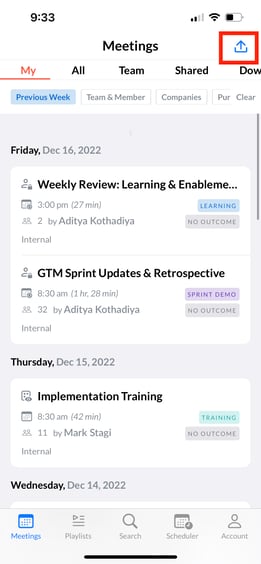
Under the Meetings tab, you have access to all past meetings, along with the ability to filter among them. When you click into a meeting, you have access to:
- The recorded video from the meeting
- The Meeting's listed Purpose and Outcome (or the ability to select one)
- Call Details (time, duration, host, participants, etc.)
- Meeting Visibility (Private, Visible to Organization, Public)
- Four tabs for call analysis
- Analysis. To understand speaker's talk time & longest monologue during the call
- Transcript. To view and search within the meetings' transcript
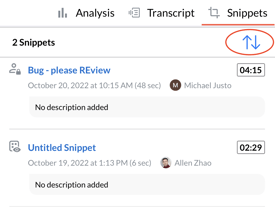
- Snippets. A listing of any snippets that were created from the meeting
- Comments. To both see any existing comments or to add any additional collaborative comments.
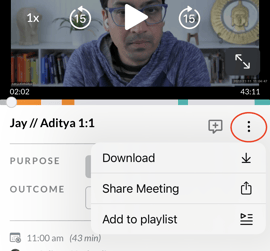
Quick tip: Clicking on the three dots will allow you to download the meeting to your phone, share the meeting, or add it to a playlist.
NOTE: You can sort the snippets by clicking on the arrows.
Speaker Playback and Skip to next speaker
With newly added playback buttons for speakers, you can listen to any speaker’s conversation.
Also Skip to next speaker button is added next to add comment, which lets you skip to next speaker’s conversation.
Uploading a Recording via Mobile
If you have an individual recording that you would like to upload into Avoma, you can do so through the upload arrow on the top right corner of the screen.
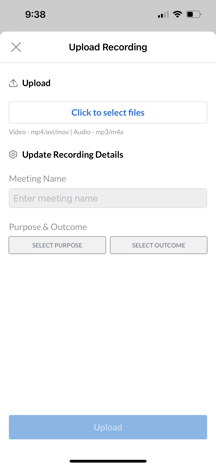
- Click the upload button.
- Select the file to be uploaded.
- Enter the meeting name.
- Choose the meeting's purpose and outcome.
- Click the Upload button.
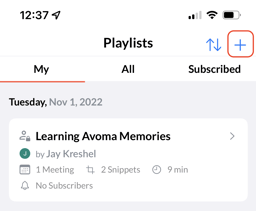
Playlists
The Playlists tab gives you access to playlists that you or your teammates have created and shared with all users in the organization, as seen under the "my" and "all" tabs. You can also find a list of playlists that you are subscribed to under the "subscribed" tab. Clicking into the playlists will give you access to all the video recordings that are part of the playlist.

Ordering the Playlists
These playlists can be ordered by clicking on the up and down arrows, which opens up a sort filter. You can sort by:
- Ascending or Descending
- By Name
- Created Date
- Last Modified Date
- Total Playtime
- Number of Subscribers
Creating Smart Playlists
Additional Playlists can be created by choosing the plus symbol (+). This opens an additional form where static or smart Playlists can be added.
For Static Playlist
- Name the Playlist
- Select the Playlist Type
- Choose the Access Permission
- Add an optional Description
- Click Create.
For Smart Playlists
- Name the Playlist
- Select the Playlist Type (Choose Filters if Smart Playlist is chosen)
- Choose the Access Permission
- Add an optional Description
- Select whether this Playlist will be for Only future recordings or All Past and future recordings.
- Click Create.
Search
Here you may type in the text to Search for a particular meeting of your choice. Or you can find any searches that you may have previously saved (or that were shared with you by other people in your organization).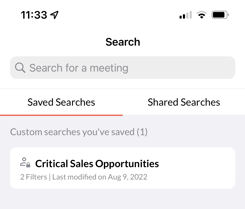
Scheduler
Clicking on the Scheduler tab gives you access to all the Scheduler links that you have created for yourself or those by your teammates. Here you can copy the link to use them or deactivate them by toggling the switch.
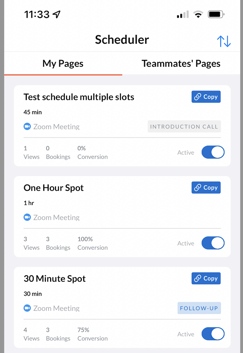
Quick tip: If you are writing an email via your mobile phone and would like to share an Avoma Scheduler link, simply go back to the Avoma iOS App, click on the Scheduler tab, and click the blue copy button, so that you can paste it into your email in seconds!
Click into one of the schedules directly to get more information about it, such as event information, scheduling preferences, and invitee information. This allows you to make sure you are copying and sharing the correct Scheduler page.
NOTE: The Scheduler pages cannot be edited via the iOS App. If you would like to make changes to the scheduler pages, you may do so via the Scheduler page on the web platform.
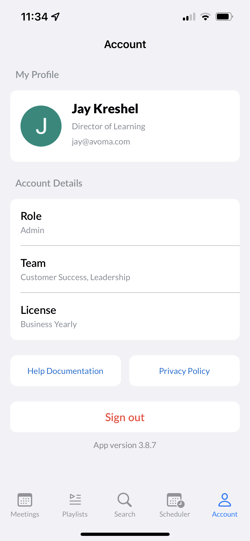
Account
Under the Account tab, you can find the details of your account (Role, Team, License). You can also access our Help Center, view the Privacy Policy, and Sign out of the app.
If you have any additional questions, please reach out to our team at help@avoma.com